


Making a knife doesn’t have to drain your wallet or demand a professional studio setup. For centuries, blades were shaped, hardened, and sharpened with nothing more than hand tools, heat, and skill. While modern machinery certainly speeds up the process, it’s not essential. A beginner relying on basic tools may spend more time shaping steel, but the reward comes in the form of a blade built entirely by hand—a piece of work that reflects patience, discipline, and craftsmanship. As you work slowly, you’ll learn to notice subtle details in the steel, refine your technique, and decide whether you want to invest in more advanced tools later.
How to make a good knife with basic tools
Understanding Knife Steel Choices
Before looking at the tools needed for shaping a blade, it’s important to understand the material itself. Knife steel isn’t interchangeable—each type behaves differently under heat, pressure, and long-term use. Beginners often find the selection overwhelming, but learning the basics helps you avoid frustration and choose a steel you can confidently work with.
Steel options vary depending on the method you plan to use: stock removal or forging. Stock removal involves cutting and filing steel to shape, while forging requires heating and hammering it into form. Both paths demand heat treating, because raw steel must be hardened and tempered before it becomes a functional blade. Since beginners may not have a heat-treating oven, it’s smart to start with steels that are easier to harden using simple tools.
Common knife-making steels include tool steels, various carbon steels, and stainless alloys. Steel comparison charts online can help you understand how each type performs. Here are some of the most frequently used steels and what makes them practical for new makers:
• O1 steel – A classic beginner’s choice: tough, forgiving, and oil-quenched. It holds an edge well and responds predictably during shaping. The only real drawback is the need for proper rust prevention.
• 1084 – Excellent for those new to heat treating. It does not require extremely precise temperatures and is readily available. The steel reaches its critical temperature quickly and does not need long soak times.
• 1075 – Similar in simplicity to 1084, this steel is affordable and easy to work with. It can even be heat treated using a basic torch because it requires lower temperatures—around 830°C—for proper hardening.
• 1095 – Higher carbon content makes this steel harder to work with, but it produces strong blades when forged skillfully. It’s often chosen by people who want to try traditional forging rather than stock removal.
• Stainless steel – Low maintenance and rust-resistant, but more expensive. It generally requires professional heat treating unless you have access to high-temperature equipment. Sharpening is straightforward, but working the steel by hand can be demanding.
Understanding these differences ensures your first knife project begins on the right foot. Choosing a steel suited to your available tools and experience level makes the entire process smoother.
Basic Tools for Beginner Knife Makers
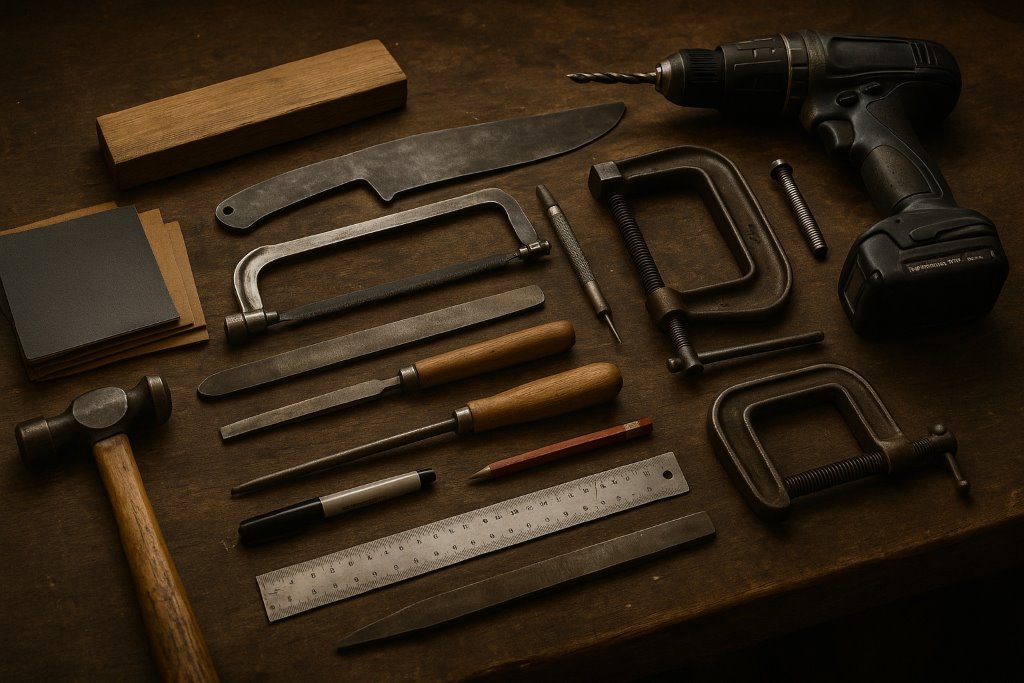
While experienced makers may fill an entire workshop with machines, a new craftsperson needs only a reliable set of simple tools. These essentials can be found in garages, barns, or hobby shops, and they’re more than enough to shape a clean, functional blade through handwork alone.
A sturdy work bench gives you a stable surface to file, clamp, drill, and assemble your materials. It doesn’t need to be fancy—just the right height and solid enough to handle pressure without wobbling. A strong vise is indispensable. It secures your blade blank while you work, making it far easier to cut, file, or sand accurately. While clamps and vise grips can substitute in a pinch, a good vise becomes one of the most dependable tools you own.
A basic hacksaw with a high-quality bi-metal blade allows you to cut your steel blank to shape. Choose blades from trusted manufacturers like Lennox, Starrett, Milwaukee, or DeWalt, since the durability of the teeth matters when cutting dense steel. To refine the shape and form the bevels, you’ll rely heavily on mill files. One coarse (bastard cut) and one smooth file give you the control needed to shape steel with surprising precision. Handles make filing more comfortable over long sessions, but they’re optional.
For handle holes or other structural features, a drill is essential. A basic cordless drill can work, though a drill press eventually provides cleaner, straighter results. Along with the drill, a set of sharp HSS or cobalt bits ensures you can cut through annealed steel without burning or snapping your tools.
A hammer, preferably a 20 oz. ball peen, is useful for small adjustments, peening pins, or tapping materials into place. A centre punch helps you mark drilling points cleanly so your bit won’t wander. For handle shaping, a sturdy wood rasp removes material quickly and lets you sculpt your grip precisely to your preference.
You’ll also need several clamps for glue-ups, a ruler for measurements, a few permanent markers for layout lines, and plenty of sandpaper—from rough 60-grit sheets for shaping to finer 600-grit for polishing. Scrap wood blocks or dowels wrapped in sandpaper act as shaping tools, helping you smooth curves and refine details.
This simple tool set is more than enough to build your first knives. Many accomplished makers began with nothing more, letting the slow, careful process teach them technique and patience.
UPGRADES: Extra Tools for Growing Skills
If knife making becomes a passion, you may want to expand your workshop with tools that save time and increase precision. A small bench-top belt sander, such as a 1"x30" or 4"x36" model, can dramatically speed up shaping, even if you eventually upgrade to a larger grinder. A drill press doesn’t need advanced features—what matters is a table that holds a true right angle. A band saw designed for metal can cut out blade profiles quickly, and even portable saws can be adapted for bench use.
For Basic Heat Treating…
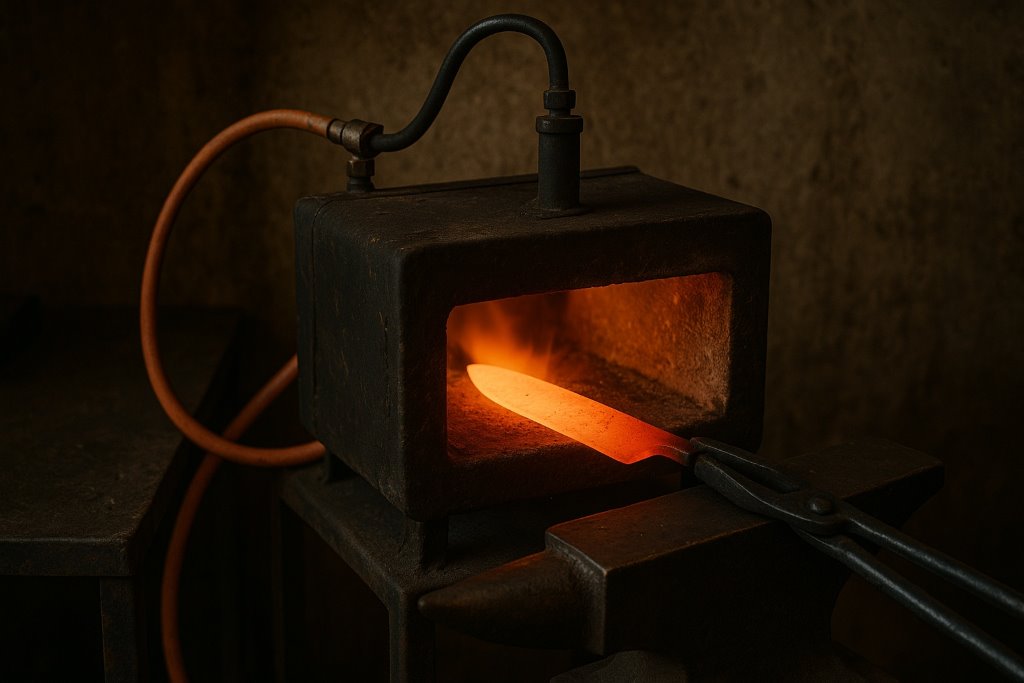
To properly harden simple carbon steels like 1080 or 1084, you don’t need a professional forge. Many beginners use propane or MAPP gas to bring a blade to critical temperature. A pair of soft fire bricks can form a compact two-brick forge that retains heat efficiently and is easy to build. A swirl tip torch such as the Bernz-O-Matic TS-8000 spreads heat evenly across the blade, unlike narrow pencil-tip torches that overheat only one spot.
You’ll also need a steady supply of propane or MAPP gas, because running out halfway through heat treating can ruin a blade. For quenching, inexpensive vegetable oil works well when heated slightly. Store it in a safe quench tank, preferably made of metal.
Heat treating also requires basic safety gear: leather gloves, a reliable magnet for testing temperature, sturdy tongs or vise grips for handling hot steel, and an oven capable of holding around 200°C (400°F) for tempering. A separate oven thermometer helps you verify accuracy, and keeping a fire extinguisher nearby is simply common sense when working with fuel and hot oil.
Proper Protective Equipment (PPE)
Safe knife making requires proper protective equipment. A good respirator—or at the very least N95 dust masks—keeps metal dust and wood particles out of your lungs. Durable safety glasses protect your eyes from steel fragments, sparks, or debris. Gloves suitable for both grinding and heat treating keep your hands safe, and sufficient lighting helps you work more accurately while reducing fatigue.